Photos from Leah and Josh’s Wedding Celebration

Josh Smiling

I went down to Lafayette, Louisiana, last weekend for my friends Josh and Leah’s wedding celebration. Leah and Josh live in Boston these days, but Josh grew up in Raine (which isn’t too far from Lafayette), and they wanted to have the wedding celebration there.

One of the main events, other than the reception itself, was a crawfish boil the afternoon of the reception. This was my first time going to a crawfish boil (and I hadn't actually eaten unshelled crawfish before either). I love shrimp, so I figured it’d be fine—my only small moment of pause was the mental image of eating food that still had its face on it. But in the end, I followed along with the more seasoned crawfish eaters, and things went just fine.

Lafayette isn't a big town, but it’s pretty charming. For the most part, I just parked my car at the hotel and walked almost everywhere—I walked to restaurants, I walked to the reception, and I ambled around for general photo-walking. A goof on my part was that my feet were frowning a bit from all that walking, but I probably should have know better than to jaunt around Lafayette in those strappy wedge sandals.

I’m so glad I had a chance to join Leah and Josh for their wedding celebration. They’re a fantastic couple, and Lafayette is a delightful little town.

Photos from Winterfamilytime 2012

Dad Laughing

Yeah, I know it’s April. But better late than never, right? Between killer projects at work and a freelance gig that was in crunch mode too, I’ve had a pretty full plate. But things have started to get back to normal, and I thought I’d do some catching up on some photo bits.

I visited my family in Charlotte for Winterfamilytime back in December and I had a jolly time seeing everyone. Gosh, that seems like ages ago. Well, I guess it kinda was.

Photos from Thanksgiving 2012

Mom Enjoying a Cuppa

I visited my parents over Charlotte over Thanksgiving. My brother and his girlfriend, Margaret, came to visit as well. They’ve been together for a bit, but I hadn’t a chance to meet Margaret until this visit—not that I had any doubts, but she was super nice and a fun person to have around.

I tried to take a few shots on Thanksgiving day, but I sort of ended up painting myself into a corner with a lighting setup that was a little too complicated for my own britches. (I had two flashes, one with a LumiQuest Softbox LTp, and one with a regular LumiQuest Softbox. I was using a line-of-sight flash trigger—Canon’s ST-E2—which usually works great, but my flashes were on opposite ends of the kitchen and that didn’t play so well with the line-of-sight part.)

In the following days, though, I pared down my setup to solely a LumiQuest Quik Bounce mounted to an on-camera 580EX II and that worked out much better—I was able to open the baffles on the Quik Bounce and that allowed me to bounce a some of the light off the ceiling, which helped soften the light quite a bit. When next Thankgiving comes around, I’ll probably try to stick with a more simplified setup (like I had on the latter days) rather than overthinking things quite so much.

Photos from Bryan and Lyn’s House

Kitchen

My friends Bryan and Lyn moved to San Diego and they asked if I could help take some shots for the listing for their house. I thought it would be a fun thing to try and I jumped at the chance. As I don’t as often take shots of homes and interiors, I did a little reading up on the subject over the few days before the shoot. Among other pages I looked through, I found that Photo Centric has a pretty comprehensive set of pages on photographing interiors.

I won’t go over all the tips they mention, but among those that stick out in my mind, they recommend using a tripod (no surprise, there) and they also stress the importance of keeping one’s camera level, especially when taking shots with a wide-angle lens. Keeping one’s camera level left-to-right is probably old hat, but they point out that keeping one’s camera level front-to-back particularly helps lessen wide-angle distortion. (This is one of those times where a hot-shoe bubble level can come in handy.)

Given the challenges of lighting an empty house—and that I didn’t want to take up their Realtor’s whole afternoon with intricate strobe setups—I turned to HDR for my shots. As I don’t often shoot HDR, I figured I should brush up on some of the details, so I picked up my well-worn copy of Scott Kelby’s “Adobe Photoshop CS5 Book for Digital Photographers” to jog my memory. (The book is mostly about processing photos with Photoshop CS5—and it’s excellent for that—but it also has a couple chapters on topics like HDR workflow.)

If you’re just getting into HDR, there’re a couple things to keep in mind on the picture-taking side. Among them, you need to shoot in RAW mode and you also need to set your camera to use exposure bracketing with a span of at least 2 stops on either side of your normal-exposure shot (that is to say, a shot 2 stops underexposed, a normal exposure, and a shot 2 stops overexposed). It’s OK if you’re able to exceed 2 stops on either end—such as a sequence of -4, -2, 0, +2, +4 if you happen to have 5-shot bracketing—but the important part is that it’s at least 2 stops.

Canon DSLRs allow for a 2-stop bracketing interval, so you can get by with just 3-shot bracketing. On the other hand—and for reasons that aren’t quite clear to me—many modern Nikon DSLRs allow for at most a 1-stop bracketing interval. Fortunately, many of those same Nikon DSLRs offer up to 9-shot bracketing sequences, so even if your shots are 1 stop apart, you can still go for a sequence such as -2, -1, 0, +1, +2 and you’ll have the range that you need.

Another trick that Scott mentions in his book is that if you enable both bracketing and high-speed continuous shooting, you can capture a full HDR sequence with a single shutter press. (On my Canon 40D, I have to hold down the shutter—click, click, click—before I let go, but other camera models might allow you to tap and let go of the shutter and have it take the entire sequence.)

It’s rather handy to be able to hold down the shutter and have the camera sweep through your bracketing sequence, but even so, one’s overexposed end of the bracketing sequence may end up with exposures as long as 3–4 seconds. You may feel that’s the least of your concerns if you’re using a tripod anyway, but sometimes even the action of depressing the shutter can introduce a tiny amount of blur when you’re dealing with exposures that long.

To help counteract that potential for camera shake, one easy solution is to use a remote shutter release. It doesn’t necessarily have to be one of those fancy wireless shutter releases—although those are fine too— but even a simple wired shutter release with a 2–3' cord is perfectly fine. The main thing is just having a shutter that’s physically separate from your camera body.

Pre-HDR-processing bracketing sequence I used for Bryan and Lyn’s kitchen

There’s a perception that HDR shots necessarily have that overprocessed “HDR look”, but that doesn’t have to be the case. If one practices restraint and resists the temptation to turn all the knobs to eleven, one can end up with shots that make use of HDR without being a garish mess. As well, although one can use fancy 3rd-party software for processing HDR shots, Photoshop from version CS5 forward is actually pretty decent, so if you already have that, you’re all set—and that’s what I used for these shots. (HDR processing in Photoshop CS4 and earlier, on the other hand, is fairly rubbish and if that’s the version you happen to have, you’re probably better off with 3rd-party software such as Photomatix.)

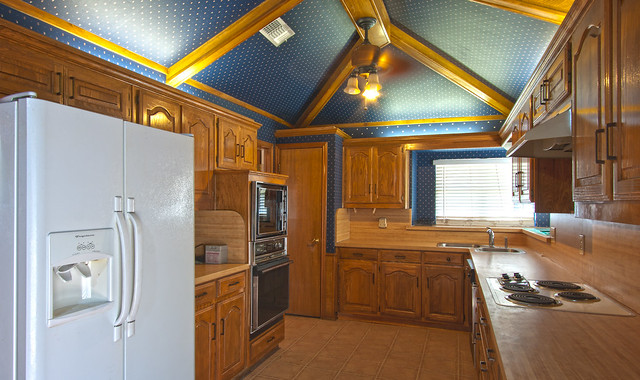
If you had wanted to see how one of my exposures came together, I’ve included the pre-HDR-processing bracketing sequence I used for the shot of Bryan and Lyn’s kitchen. At first glance, the 2-stops-overexposed shot (the bottom shot among the three) may look similar to the final HDR shot (which you can also see at the top of this post), but if you take a closer look, you can see that both the fridge and the window ended up blown-out in that shot. As well, if you look at the kitchen ceiling in each of the three shots, you can see how no single exposure was able to capture the ceiling without either overexposing or underexposing swaths of it. Fortunately, that’s an area in which HDR can help and in the final shot I was able to get a more even exposure across the ceiling.

If you know what to look for, you may see a few signs of HDR in a couple shots, but I was really just looking for lifelike exposures without turning the shots into photographic versions of Toontown. After processing the shots, I passed them along to Bryan and Lyn’s Realtor and he added them to their listing. I’m really happy to have be able to help out my friends a bit and I’m pleased with how they turned out.

Recipe: Ginger Molasses Cookies

My brother made some of these ginger molasses cookies over the winter break, and I rather enjoyed them. They have a crisp exterior but a chewy interior, and they sort of resemble a cross between gingerbread and spice cookies.

Later I asked my brother for the recipe and he happily passed it along, mentioning that he originally got the recipe from his friend Kristin. (They’re yummy, Kristin!)

Note: The full recipe makes about 40 cookies, while the halved recipe makes about 20. I’m including both versions since you might not always need forty cookies ;).

Ginger Molasses Cookies—Full Recipe

You might already have some of these spices in your pantry, but keep in mind that ground spices start to lose their flavor after about 8 months. If your spices are older than that—or if you’re not sure how old they are—you may be best off buying new ones.

Ingredients:

  • 4 ½ cups (639 grams) all purpose flour
  • 4 teaspoons ground ginger (ground ginger from the spice aisle is fine)
  • 2 teaspoons baking soda
  • 1 ½ teaspoon ground cinnamon
  • 1 teaspoon ground cloves
  • 2 teaspoons salt (bonus tastiness points if it’s noniodized salt)
  • 3 sticks (339 grams) butter, softened or at room temperature (Or for a vegan version, I’ve had success with Miyoko’s Vegan Butter, which I found at Target.)
  • 2 cups (396 grams) sugar
  • 2 eggs that have come to room temperature (Or for a vegan version, I’ve had success with Bob’s Red Mill Egg Replacer, which I found at Target.)
  • ½ cup (170 grams) molasses
  • Set aside in a cereal bowl: ¾ cup (150 grams) turbinado sugar (“sugar in the raw”) or granulated sugar with 1 teaspoon kosher salt that you’ve mixed in with a fork

Directions:

  1. Preheat oven to 350°F (177°C).

  2. In a medium bowl, stir together flour, ground ginger, baking soda, cinnamon, ground cloves and salt—set aide.

  3. In a large mixing bowl, beat butter with an electric mixer on low speed for 30 seconds to soften. Add 2 cups (396 grams) of sugar, beat until combined, scraping sides of bowl occasionally. Beat in eggs and molasses until combined.

  4. Beat in as much of the flour mixture as you can with the mixer. If need be, use a wooden spoon to stir in any remaining flour mixture.

  5. Shape dough into 1 ½ to 2-inch balls (4 to 5 cm). (If you have a digital scale, aim for around 28 to 30 grams per ball.) Roll the balls in the sugar & kosher salt that you had set aside. Place the dough about 2 ½ inches (6 ½ cm) apart on baking sheets.

  6. Bake for 12–14 minutes. If you’re baking multiple sheets at a time, swap the sheets halfway through. Bake the cookies until they’re light brown and puffed. After you take them out of the oven, let them cool on the baking sheet for 2 minutes, and then transfer them to a wire rack to cool.

Ginger Molasses Cookies’Halved Recipe

Ingredients:

  • 2 ¼ cups (320 grams) all purpose flour
  • 2 teaspoons ground ginger (ground ginger from the spice aisle is fine)
  • 1 teaspoon baking soda
  • ¾ teaspoon ground cinnamon
  • ½ teaspoon ground cloves
  • 1 teaspoon salt
  • 1 ½ sticks (170 grams) butter, softened or at room temperature (Or for a vegan version, I’ve had success with Miyoko’s Vegan Butter, which I found at Target.)
  • 1 cup (198 grams) sugar
  • 1 egg that has come to room temperature (Or for a vegan version, I’ve had success with Bob’s Red Mill Egg Replacer, which I found at Target.)
  • ¼ cup (85 grams) molasses
  • Set aside in a cereal bowl: 6 tablespoons (75 grams) turbinado sugar (“sugar in the raw”) or granulated sugar with ½ teaspoon kosher salt that you’ve mixed in with a fork

Directions:

  1. Preheat oven to 350°F (177°C).

  2. In a medium bowl, stir together flour, ground ginger, baking soda, cinnamon, ground cloves and salt—set aide.

  3. In a large mixing bowl, beat butter with an electric mixer on low speed for 30 seconds to soften. Add 1 cup (198 grams) of sugar, beat until combined, scraping sides of bowl occasionally. Beat in the egg and molasses until combined.

  4. Beat in as much of the flour mixture as you can with the mixer. If need be, use a wooden spoon to stir in any remaining flour mixture.

  5. Shape dough into 1 ½ to 2-inch balls (4 to 5 cm). (If you have a digital scale, aim for around 28 to 30 grams per ball.) Roll the balls in the sugar & kosher salt that you had set aside. Place the dough about 2 ½ inches (6 ½ cm) apart on baking sheets.

  6. Bake for 12–14 minutes. If you’re baking multiple sheets at a time, swap the sheets halfway through. Bake the cookies until they’re light brown and puffed. After you take them out of the oven, let them cool on the baking sheet for 2 minutes, and then transfer them to a wire rack to cool.