I’ve really been enjoying my new camera (a Nikon D80) since buying it in January. And other than the occasional blown highlights, I find that it usually takes pictures just as I’ve intended.
One helpful tip which I picked up from my brother (who also has a D80) is to manually set the white balance in each new shooting environment (such as incandescent, fluorescent, sunlight, or others). I don’t mean to imply that the D80 is bad at guesstimating a scene’s white balance on its own, but it’s an easy setting and often makes a real difference. (The D80’s white balance settings are covered on p.58 of the US-English manual, for what it’s worth.)
If you’re into photography, you may already be familiar with gray cards — a uniformly gray rectangle that can be used to fine-tune a shot’s exposure. A seemingly related device — but one which serves a completely different purpose — is a white balance card. These are also typically rectangles and they're usually gray. Rather than an exposure tool, however, white balance cards are used to provide a white-balance reference point within images (I’ll explain).
If you’ve ever played around with your camera’s white balance settings (or even if you’ve stuck with your camera’s automatic white balance mode), you’ve probably run across the occasional shot which ended up with the wrong white balance — one common symptom is Caucasian skin looking a bit yellowish or even orange-tinged. This happens because the light within the scene may not have been “white” in the first place; for instance, light during a sunset of very often reddish or orange. And even though the human eye can quickly adapt to varying colors of light, cameras aren’t always so lucky.
This is where a white balance card comes in. A white balance card is calibrated to a specific shade of gray; so, when it comes time to color-correct a photo, you can tell your image editor (such as Photoshop) to “adjust this photo’s color until the point under my eyedropper matches this certain shade of gray”. And if that sounds complicated, it’s really not — Adobe Bridge (a sister app to Adobe Photoshop) has an eyedropper that’s preconfigured for just this purpose. I’ve had a WhiBal white balance card for the past few months and I’ve been impressed by how easy it’s been to get perfect white balance in my shots.
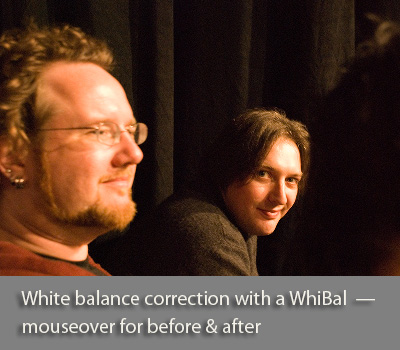
Consider the photo at the top of this post, for instance. If you’ve seen my shots from this year’s SXSW, you may recognize it as one of my shots from the Helvetica screening. As it turns out, I had been taking some shots outside earlier in the day and, as it was cloudy at the time, I had my white balance set to “cloudy” — when it came time for the screening, though, I forgot to change it back to a more appropriate white balance setting (d’oh!). However, because I had taken a few WhiBal shots while I was there, none of that mattered. It’s like having a bottomless stack of “Get Out of Jail Free” cards when it comes to white balance.
I consider photography one of my hobbies, but I’m not one for frivolous baubles. Having said that, I make an exception for my WhiBal. It’s easy to carry around and the benefits are really there. And if you don’t quite have your head wrapped around this “white balance thing”, not to worry — the WhiBal site has section with videos that go over white balance and an example workflow with a WhiBal. I don’t have any affiliation with this company — I’m just a really satisfied customer.
A few things:
1) If you shoot in raw, you can tweak white balance settings without actually modifying the image at all. I thought people who shot in raw were insane until I started doing it – and now I’ll never go back. (I’m a happy user of a D70.. hoping to upgrade to a D200 soon.)
2) If you want to really get some use out of your camera, go buy Thom Hogan’s eBook for the D80. It’s worth every penny, plus more! (No affiliation – just a happy customer!)
Thanks for the tips, Nate. As it turns out, I think I ended up following the same mental path you did for raw images (thinking that it seemed like overkill, at first, but then digging it after I discovered all the lossless modification stuff).
As far as Thom Hogans’s book, were there specific topics that you were able to pick up on, even after having read the manual? Or would you say that it covered much of the same ground as the manual, but with different/better wording?
Wait, which is the before and which is the after on that photo? I suspect the mouse_over is after but the faces look sort of dead.
Yup, the mouseover image is the “After” photo. I’m sorry if the faces came off as a bit dead, but I’m guessing the direct lighting within the screening room might be contributing to that. Or maybe we’re just a bunch of tanless geeks who haven’t seen much sun lately ;). Either way, here’s the full-size version of the shot in case that helps.
I use a lens filter from expoImaging (http://expodisc.com/) called the expodisc for this and it works great. It is an opaque filter you place on your lens (or hold in front of it you are using a different lens), and put the camera into the wB calibration mode. You have to re-calibrate each time you change lighting, but you have to take your reference shot every time you change lighting too. But then in post processing, you don’t have to fix each picture, they come out right automagically.
They have a bonus warming and cooling version too that still give very natural looking pics, but slightly warmer or cooler for skin tones.
Check it out.
Hi Ashley! Your blog is great. Before I went to Dallas Camera Club meeting, I searched for “Dallas Camera Club” and found your page. The information you wrote here was really helpful! In fact, I did go to the meeting and I’m pretty sure it was you I was sitting in front of! Anyway, congrats on your new camera and all your great pictures! :)
Thanks much for the post, Alex. I read up on the expodisc (thanks Jason) also, but decided that Whibal might be the way to go for me. Alex, have you used the jpeg plugin, tho’?
@Jason: The ExpoDisc looks tempting — it’s rather handy that it doesn’t require any extra steps after a photo’s been taken. On the other side of the coin, though, I also like some of the flexibility that the WhiBal offers in that it can be used either before or after a shot’s been taken.
@Michelle: Hi there! Indeed, I am the fellow that sat behind you at the last Dallas Camera Club meeting :). Thanks also for your kind words — I’m glad you’ve enjoyed my shots.
Hi… I found your page when I was searching for “Dallas camera club.”
Regarding the white balance: the one problem you may find with such cold-hard (or is that card-hold?) white balancing methods is that you aren’t actually supposed to *always* see neutral lighting. Quite frequently the light should not be entirely neutral. For this reason I sometimes set my white balancing to slightly off-neutral to bring back some natural wavelength shift.
I often do not even gel my strobes and am quite happy with the white balance I get, finding it just as good as manually card balancing it…
Cheers,
Matthew
You make a good point there, Matthew — an accurate white balance isn’t always the most artistic option. All the same, I often find it handy to have a known starting-point on those occasions where I might be futzing with white balance.
Yes, Quite frequently the light should not be entirely neutral. For this reason I sometimes set my white balancing to slightly off-neutral to bring back some natural wavelength shift.
The difference in the sample-picture is astonishing…absolutely preferable! A little bit more white seems better than too less.
Thanks!
[…] addition to my usual camera gear, I also took along my WhiBal white balance card and it worked a treat. In particular with the turkey preparation scenes within the kitchen, the […]